Thank you for visiting!
We've re-branded our website and will continue to keep you updated on exhibit news, trends, designs, and creations in our 'NEWS' section at www.exhibit-solutions.com.
Our most popular posts!
-
 I was just able to get some photos from our newest build - we call it Microsoft Canada's 'Shadow Box' exhibit. These images ar...
 -
 Booth flooring is an important component in the exhibit design process. Work with your exhibit house to make your space stand out - revie...
Thursday, December 5, 2013
Thursday, November 22, 2012
6 Tips for Preparing your Trade Show Graphics
Clients ask us all the time about file formats, image sizes, and resolution for their booth graphics.
If you are working with a graphic designer or an agency - in most cases they will know how to set-up the files for production. However, with some basic graphic knowledge under your belt - you should be better equiped to navigate this crazy world of artwork and printing. Not only will you be able to ask your designer the right questions, provide clearer direction on artwork, but you will have a better experience choosing and producing artwork for your trade show exhibit.
Below you will find six tips to keep in mind when sending your exhibit house artwork for your booth.
(1) Stick to the Timelines
To help prepare your file for printing we have some guidelines that should be followed in order to obtain the best results.
Prepare you artwork in a supported based files using:
(3) Check your Artwork Elements
The Basics
 Bitmap or raster is when the images are resolution dependent. They cannot scale larger than their established resolution without losing quality, so please...
• Avoid JPEG compression - even with maximum quality it still has data loss
• Make sure that your image has enough resolution to maintain the quality at final size output
Vector illustration rely on mathematical equations to represent graphics. The graphics may be changed without loss of quality and are therefore the preferred when it comes to graphics or logos. Please remember to...
 • Remove any stray point or elements not needed
• Avoid transparency in Illustrator files due to separation issues
• Set Illustrator files colour mode to CMYK and not RGB
• Convert all text used in Illustrator files to outlines / curves
Quality Control and Resolution
 When an image is resized, the pixels stretch and fewer dots are able to fit within an inch. The larger the dots become,
the easier the dots can be seen. This is called pixelation.
*We recommend submitting artwork 150 DPI (dots per inch) or higher
(4) Provide Pantone Colours when available
Pantone
The Pantone Matching System was created so colours can be matched consistently across multiple platforms. Due to different printers, ink and media, not all colours can be precisely duplicated.
 CMYK
CMYK
CMYK is used in printed graphics, the CMYK model refers to the four inks used in the printing process; Cyan, Magenta, Yellow and Key (black)
 RGB
RGB
The colours displayed on your TV or computer monitor are composed of red,green and
blue. RBG values are appropriate for digital graphics, like website banners.
We will do our best to come as close as possible to the colours you request. We recommend ordering a print proof to approve any colour matches. If your project requires a Pantone colour match, please reference a Pantone Solid Coated chart. Colour matching and print proofs will involve additional costs and will add extra time to production, so please plan accordingly.
(5) Set Up your Artwork for Production
This may seem like a lot to remember but your graphic designer or graphic agency should know & be familiar with this. And don't worry - we will check all the artwork and files when we receive them. Before we print your graphics - we will send you a pre-press proof and you you and your Account Manager can double check all the artwork.
If you are working with a graphic designer or an agency - in most cases they will know how to set-up the files for production. However, with some basic graphic knowledge under your belt - you should be better equiped to navigate this crazy world of artwork and printing. Not only will you be able to ask your designer the right questions, provide clearer direction on artwork, but you will have a better experience choosing and producing artwork for your trade show exhibit.
Below you will find six tips to keep in mind when sending your exhibit house artwork for your booth.
(1) Stick to the Timelines
- Keep graphics deadlines in mind
- Digital prints are usually required 3 weeks prior to the ship date (not the show date) and 5 weeks prior for fabric graphics
- If in doubt, confirm timing with your Account Manager
To help prepare your file for printing we have some guidelines that should be followed in order to obtain the best results.
Prepare you artwork in a supported based files using:
| Adobe Illustrator - up to CS5 |

(3) Check your Artwork Elements
The Basics
 Bitmap or raster is when the images are resolution dependent. They cannot scale larger than their established resolution without losing quality, so please...
• Avoid JPEG compression - even with maximum quality it still has data loss
• Make sure that your image has enough resolution to maintain the quality at final size output
Vector illustration rely on mathematical equations to represent graphics. The graphics may be changed without loss of quality and are therefore the preferred when it comes to graphics or logos. Please remember to...
 • Remove any stray point or elements not needed
• Avoid transparency in Illustrator files due to separation issues
• Set Illustrator files colour mode to CMYK and not RGB
• Convert all text used in Illustrator files to outlines / curves
Quality Control and Resolution
the easier the dots can be seen. This is called pixelation.
*We recommend submitting artwork 150 DPI (dots per inch) or higher
(4) Provide Pantone Colours when available
Pantone
The Pantone Matching System was created so colours can be matched consistently across multiple platforms. Due to different printers, ink and media, not all colours can be precisely duplicated.
CMYKCMYK is used in printed graphics, the CMYK model refers to the four inks used in the printing process; Cyan, Magenta, Yellow and Key (black)
RGBThe colours displayed on your TV or computer monitor are composed of red,green and
blue. RBG values are appropriate for digital graphics, like website banners.
We will do our best to come as close as possible to the colours you request. We recommend ordering a print proof to approve any colour matches. If your project requires a Pantone colour match, please reference a Pantone Solid Coated chart. Colour matching and print proofs will involve additional costs and will add extra time to production, so please plan accordingly.
(5) Set Up your Artwork for Production
- If not submitting images at the full size (100 %), please ensure the ratio is indicated on the proof or the artboard
- Build the file with the final trim size of the project in mind. Layouts should be in inches or millimetres and proportional to the final output size
- Always provide a bleed, check with your Account Manager - these may be different for different print methods and substrates
- Double check all sizes, elements and spot colours in preparation of your project
- Be sure to include any linked or embedded images with job submission
- Include up-to- date PDF proofs or JPEGs of the absolute final file and indicate any special areas of concern
- Include all fonts used
- Include the job within one folder - avoid nesting folders or elements
- Send all necessary documents, files, proofs and instructions together
- Only send files necessary for project
This may seem like a lot to remember but your graphic designer or graphic agency should know & be familiar with this. And don't worry - we will check all the artwork and files when we receive them. Before we print your graphics - we will send you a pre-press proof and you you and your Account Manager can double check all the artwork.
Thursday, November 8, 2012
Halo 4 - a success at EB Games 2012
The EB Games Canada show takes place in a different location every year. This year it was held in beautiful Whistler, British Columbia. With a fantastic booth space (in the Grand Foyer of the Whistler Telus Conference Centre), the exhibit was spread out over almost 80 feet! We were able to take the whole foyer and turn the space into a complete Halo experience. We'd also like to thank Pascale at Gadbois Photography for the great photos she took at this event!
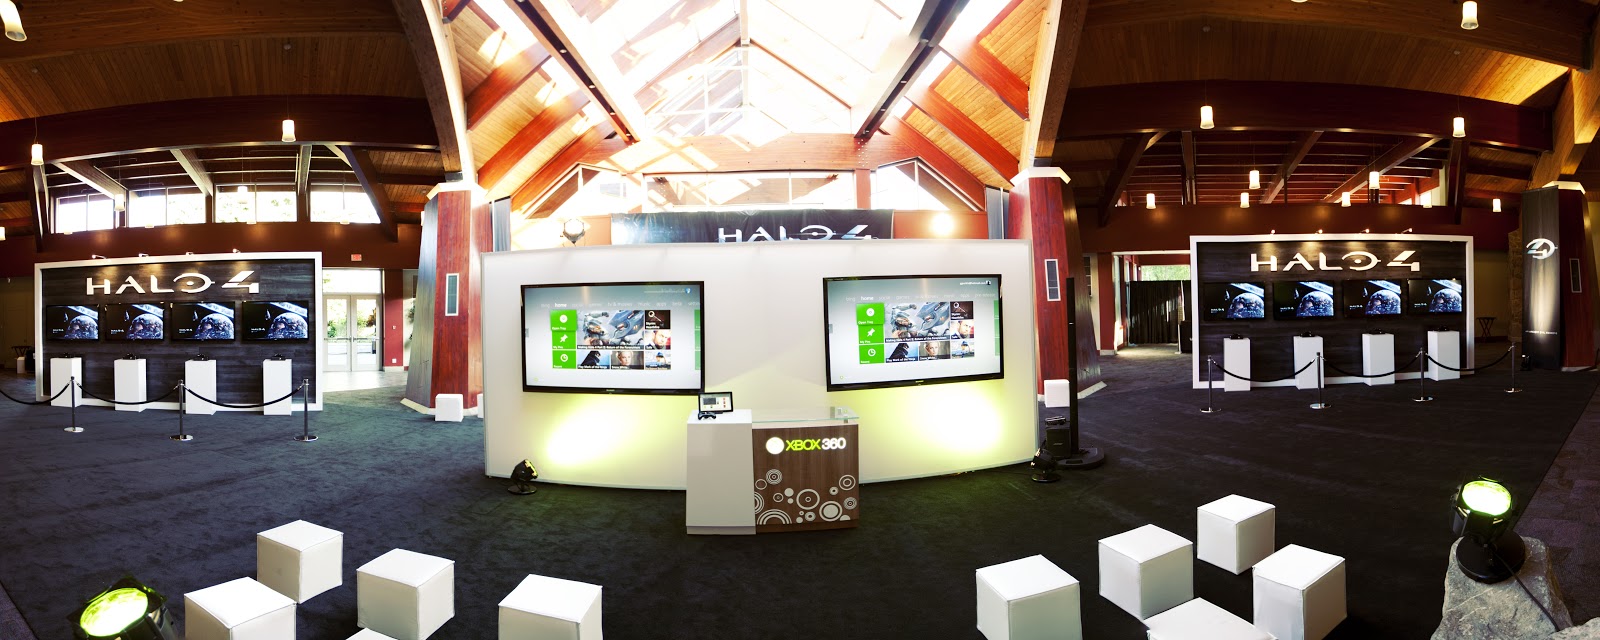
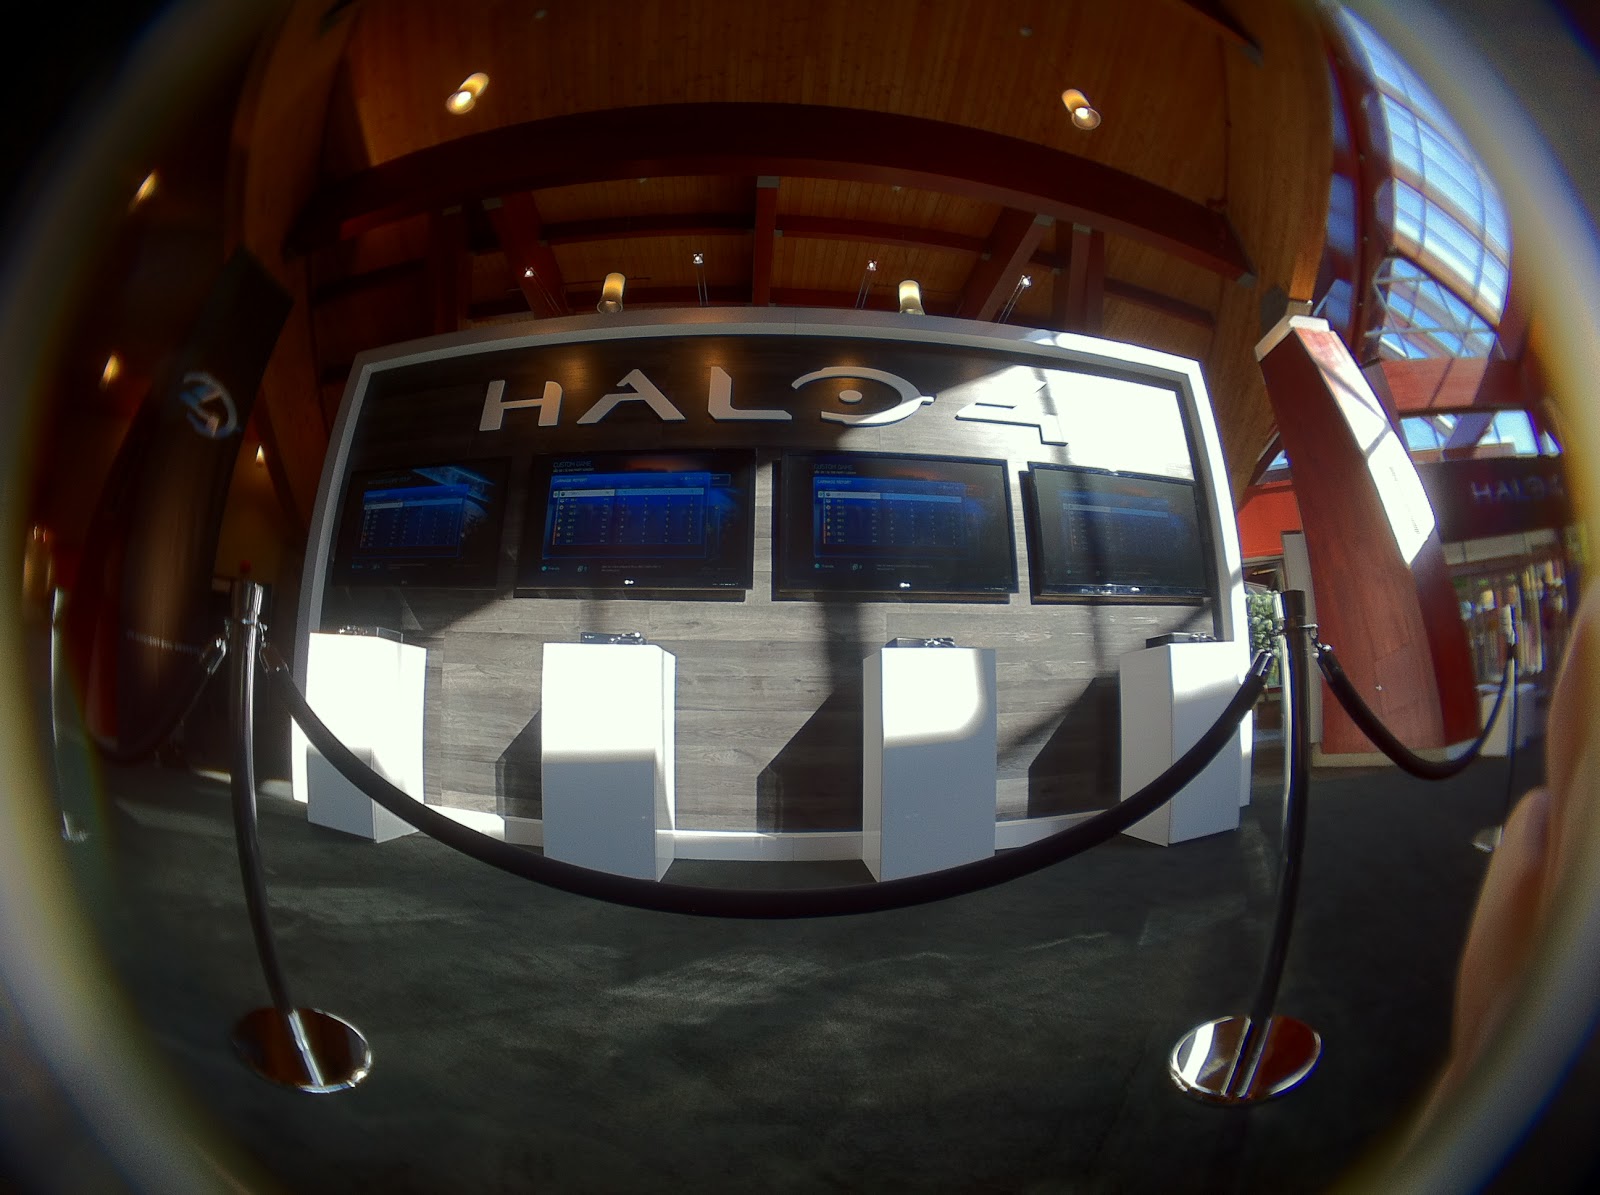


A couple of my favorite elements in this booth were the dimensional HALO 4 logos and the HUGE 80" TVs we used in the XBOX360 area.


 |
| yes - those are 80" TVs |
I wish I could have been there - it looked like the attendees had fun (unfortunately I can't share the 'dancing' videos here!) but below is a tour of the booth.
Thursday, September 6, 2012
Greenbuild has got me thinking about green exhibiting
I came across the link to the upcoming Greenbuild 2012 show in San Francisco and I found myself thinking about any changes, developments or advances when it comes to green exhibiting.
Yes, we are an exhibit house and I feel like it is our responsibility to be a leader in this space, but like everyone else we have to keep educating ourselves.
So...curious and excited, I did some research.
GREEN OPTIONS
To be honest I did not come across anything that was as amazing as I had hoped. However, I was still happy to find that there are more and more options for, and suppliers of:
You can check out other eco-friendly exhibit products from Exhibitor Online's 'Green Gallery'
SUSTAINABLE TRANSFORMATIONS
My feeling is that there are MORE products to choose from today - but I think it's how you manage your exhibit program as a whole that will have a bigger impact.
I don't mean to sound cynical but I think 'going green' is much more of a lifestyle choice - and not so much about a single eco-friendly bannerstand. That is why I think what Tom Bowman is promoting with his company Bowman Global Change is the way we need to take on our green initiatives, they "...help organizations make sustainable transformations."
MONEY MONEY MONEY
How can I talk about green initiatives and not bring up costs. I read a comment a U.S. exhibitor wrote about green exhibiting and he said that the only 'green' people see is the additional money they have to spend. The Exhibitor Magazine survey confirms this:
With that said, I'd like to focus our attention again to the overall initiatives we could take to create a more sustainable exhibit program. A tweet just came through from the IDSA (Industrial Designer's Society America) sharing a seminar entitled 'Improving Products Through Sustainable Design'
"...Learn how to decide on the right strategies for optimizing a product’s life and end-of-life and how to get the most use out of the materials and energy that your product uses throughout its life cycle."
I guess that is how we should think of our exhibits or trade shows. Not as a one time purchase - but consider your exhibit in the context of your overall Marketing life cycle. I'm not saying that you shouldn't work with your exhibit house to choose the most socially responsible (and probably more expensive) materials and products for your booth - I'm just suggesting that you also consider the impact of shipping, number of staffers attending, printed materials for your show, and tackle these along with designing and building a sustainable exhibit.
_______________________________________________________________________________
I'll leave you with this excerpt from Invista's 'non-booth concept' press release for Greenbuild in 2008:
[Source and full article: Invista / Officenewswire]
Yes, we are an exhibit house and I feel like it is our responsibility to be a leader in this space, but like everyone else we have to keep educating ourselves.
So...curious and excited, I did some research.
GREEN OPTIONS
To be honest I did not come across anything that was as amazing as I had hoped. However, I was still happy to find that there are more and more options for, and suppliers of:
- Recycled Aluminum Extrusions
- Bamboo products (flooring/infill panels)
- water-based, low VOC (Volatile Organic Compound), and VOC Free stains and paints
- Fabrics made from recycled materials
- Graphics that are recycled, recyclable, or made from recycled pop bottles
- Eco-glass (made from 100% recycled material) instead of acrylic
- Eco-carpets
- LED lighting instead of incandescents, fluorescents or halogens
- Refurbishing existing exhibits
- Recycling retired exhibit components
You can check out other eco-friendly exhibit products from Exhibitor Online's 'Green Gallery'
SUSTAINABLE TRANSFORMATIONS
My feeling is that there are MORE products to choose from today - but I think it's how you manage your exhibit program as a whole that will have a bigger impact.
I don't mean to sound cynical but I think 'going green' is much more of a lifestyle choice - and not so much about a single eco-friendly bannerstand. That is why I think what Tom Bowman is promoting with his company Bowman Global Change is the way we need to take on our green initiatives, they "...help organizations make sustainable transformations."
MONEY MONEY MONEY
How can I talk about green initiatives and not bring up costs. I read a comment a U.S. exhibitor wrote about green exhibiting and he said that the only 'green' people see is the additional money they have to spend. The Exhibitor Magazine survey confirms this:
LOOK AT THE BIG PICTURE'In 2007, 73 percent of exhibitors reported they would pay at least a 5-percent premium for Green alternatives, compared to only 60 percent in 2011. Furthermore, the generally higher cost associated with Green materials topped respondents' list of primary obstacles in their path toward going Green, followed closely by the challenges of a weak economy'[Source: Exhibitor Media Group - EXHIBITOR Magazine's 2011 Green Exhibiting Survey]
With that said, I'd like to focus our attention again to the overall initiatives we could take to create a more sustainable exhibit program. A tweet just came through from the IDSA (Industrial Designer's Society America) sharing a seminar entitled 'Improving Products Through Sustainable Design'
"...Learn how to decide on the right strategies for optimizing a product’s life and end-of-life and how to get the most use out of the materials and energy that your product uses throughout its life cycle."
I guess that is how we should think of our exhibits or trade shows. Not as a one time purchase - but consider your exhibit in the context of your overall Marketing life cycle. I'm not saying that you shouldn't work with your exhibit house to choose the most socially responsible (and probably more expensive) materials and products for your booth - I'm just suggesting that you also consider the impact of shipping, number of staffers attending, printed materials for your show, and tackle these along with designing and building a sustainable exhibit.
_______________________________________________________________________________
I'll leave you with this excerpt from Invista's 'non-booth concept' press release for Greenbuild in 2008:
In lieu of shipping a booth and supplies to the show site in Boston, INVISTA created its exhibit with all locally sourced and reclaimed materials, based on a minimalist design. Defining the space was a 14-year-old carpet removed recently from a leading Boston-area university, which demonstrated durable performance and the environmental message of the Antron® carpet fiber brand, “Sustainability starts with products that last.”
Vintage furniture greeted visitors along with 1950’s style chalkboards that displayed brand messaging and graphics created onsite by an artist, all sourced locally. All booth materials were reused or donated to local charities after the show. The reclaimed carpet were cut into sample sizes and used by Antron® fiber consultants to demonstrate the lasting texture retention, soil resistance and stain resistance Antron® fiber brings to commercial carpet constructions
[Source and full article: Invista / Officenewswire]
Wednesday, August 29, 2012
More - rendering versus photo
Our 'Exhibit Rendering or Exhibit Photo' post was quite popular so I thought I would share some more images with everyone. To be honest, even though I look at these everyday, I am still surprised at what technology allows us to do when designing an exhibit or booth concept. The graphics may not be the same as the ones chosen for the booth - but exhibit renderings provide us with a great opportunity to see what the final concept will look like on the show floor.
The design and rendering process takes a long time but the outcomes are pretty impressive. Below are some more rendering versus photo examples of both purchased and rental installations/booths:


.JPG)


.jpg)
The design and rendering process takes a long time but the outcomes are pretty impressive. Below are some more rendering versus photo examples of both purchased and rental installations/booths:
.JPG)
Tire Wall for Hyundai Dealership


 |
| Danone @ Wal-Mart Vendor Fair (Rental) |
 |
 |
| Maple Leaf Foods @ Wal-Mart Vendor Fair (Rental) |
.JPG)
.JPG)
.JPG) |
| Economical Insurance Group @ Home Hardware (Rental) |

.jpg) |
| Uponor 10x20 - 10x10 (Purchase) |


.jpg)
Wednesday, August 15, 2012
Moving on up - 5 tips on how to move from your portable to a custom exhibit
We receive a lot of calls from exhibitors who want to make the jump from their draped table to a custom designed booth. Some already have bannerstands and pop-ups but are looking to make more of an impact and stand out from their competitors.
But how do you go from this...........................to this?
 |
| 10'x10' draped table |
 |
| 20'x20' custom exhibit |
1. Do some research
Go online and do a bit of prep work. Look at exhibit houses in your area (or in the city you will be exhibiting), browse their gallery of work, check their capabilities to ensure that they specialize in custom designs, and make notes of design elements that you like - or don't like. Don't forget to ask colleagues or friends who have exhibited because they may have an exhibit house they could recommend. Choose two or three you would like to speak with and move on to step 2.
2. Make a wish list
I am a note taker and list maker - which brings us to my second suggestion: Write down all the features you or your team would like to have in your booth and don't forget to highlight the must-have elements. Some of the basic things your Account Manager will ask you about are:
- Booth size
- Seating
- Storage
- AV/Media
- Signage/Messaging
- Presentations or Demos
- Flooring
- Anything else?
Writing down all the elements you would like to see in your custom designed exhibit will help your account manager and booth designer understand what is important to you and your team.
3. Get your facts straight
This part is not as much fun as the design wish list but very important when you are making a sizeable investment in a custom designed exhibit. Think about and be prepared to answer questions on:
- SHOWS. When is your next show? How many times a year will you be using this exhibit? Where do you exhibit? Do you exhibit in different booth sizes at different shows?
- BUDGET. This is crucial because you are no longer looking at a $1000 to $2000 investment in your exhibit program - you might be looking at $30,000 for a 200sq ft booth [$144/$160 per sq ft based on the Exhibit Designers and Producers Association's 2011 Economic Survey - average cost for an in-line/single tier island exhibit].
- SERVICES. Who will manage all the show services (orders, shipping, set-up, dismantle....)? Will your team do this or do you want to work with a full-service exhibit house?
4. Ask questions
Once you have your exhibit house on the phone I know they will ask you for a lot of information. But don't forget that you are also trying to qualify them. Ask questions that will help you establish if you and your exhibit house are the right fit. Like buying a house - you want to trust your real estate agent, you want to feel like they understand what you are looking for, you want to build a relationship when making this kind of investment.
Ask the exhibit house about their custom design work, the cities they exhibit in, the services they provide, their production capabilities, the design process, visit their facilities and you can even ask them to speak to a couple of their existing clients for some feedback on their work.
5. Make the jump
If you have found the one (or two) exhibit houses that you have a good connection with, tell them that you would like to kick off the design process. This might involve an in-person meeting with the designer, a few concepts, and then a final design before you go into production - but your account manager should be walking you through each step of the design and build process.Exhibitor magazine posts a lot of exhibitor success stories online (Case Studies By Company). Even though they feature a lot of larger exhibits - you can read about exhibitor's innovative marketing plans, unique exhibits, and even find inspiration to make the leap to a custom designed exhibit.
Thursday, August 9, 2012
Staging your home? Staging your exhibit?
I often visit the Houzz site and love looking at beautiful homes, but I often wonder how those owners keep their amazing spaces neat, tidy and free from clutter. Of course most of these houses had interior designers hard at work and it got me thinking about an article I just saw posted by Freshome Design & Architecture; it was about home staging and the impact on the sale of your property.
With Toronto's housing market booming the way it is - I have experienced first hand what a difference it makes to stage your house for sale. I'm not only suggesting for you to clean your home but have a design savvy friend help you de-clutter your space, rearrange furniture, or even go out and hire a professional stager. Home buyers will not be able to look past all the 'junk' at the beautiful woodwork, the great pot-lights, or the beautiful kitchen.
I believe the same applies to exhibits. I started to think about what booths we have done where staging played an important role in making the product or messaging stand out.
I want to share two examples. The first is Microsoft's 'Home' exhibit for a Future shop event in Whistler. They had asked us to help create an environment, that not only provided some space for a trainer to talk to a few attendees, but also allowed them to showcase their products in a 'home' setting. This booth was very different from our usual 'corporate' exhibits and even though we did not go the traditional route of building a small scale house - there was still a lot of staging going on!

The second example I found (and we can't take any credit for the staging!!!) is from Mucci Farms.
The first set of images were taken after our installation crews set-up the booth: you have the carpet down, the exhibit structure up, the lighting, graphics, AV and rental furniture ready for the show.

You can see from the 'before' and 'after' that the booth is fairly plain until all their produce is showcased throughout the space. The greenhouse vegetables are so vibrant in colour and the Marketing Coordinator did a fantastic job incorporating their product into the staging of their exhibit. Cushions, vases, bowls, and other accessories were used to complete the look.
I guess staging is not strictly for your home anymore!
If you want some tips on styling or staging your home (or even exhibit) - you can read the article "Why Home Staging Could Give You The Edge in The Property Market"
Subscribe to:
Posts (Atom)